
I trained a model. What is next?

I participated in machine learning (ML) competitions at Kaggle and other platforms to build machine learning muscles. I was 19th in the global rating, got Kaggle Grandmaster title.
Every ML challenge ended with new knowledge, code, and model weights.
I loved new learnings but ignored the value that old ML pipelines could bring. Code stayed in private GitHub repositories. Weights were scattered all over the hard drive. In the end, all of them were deleted.
The situation is not unique to Kaggle. Same story in academia. The student trains a model, writes a paper. After it is accepted to the conference, pipelines are abandoned, training artifacts deleted and student moves on.
This article will talk about small steps that you can do after the end of every ML challenge.
These steps will:
- Boost technical knowledge.
- Build a personal brand.
- Improve career opportunities.
- Make the world a better place :)
As an example, I will use the repository https://github.com/ternaus/retinaface
It was not a part of a Kaggle challenge but was created to illustrate the story.
+5 min: Release code to the Public GitHub repository
Most likely, code is already at GitHub, but in a private repo.
What will you lose if you will make it public?
There are situations when private should stay private, but in your pet project, your Kaggle solution, or your paper, it may not be the case.
The most common obstacle that I have seen: people assume that all public code should be perfect and that they will be judged if it is not the case.
In reality, no one cares. Just do it. Release it as is, without any polishing.
Making code public is an important psychological step. Releasing non-perfect code is a confident, bold move.
Besides, all later steps are based on this one.
Example: https://github.com/ternaus/retinaface
+20 min: Improve readability.
You can improve the readability of your python code by adding syntax formatters and checkers.
It is not hard and not time-consuming. Checkers and formatters will not transform bad code into good, but the readability will go up. Think about fixing syntax as about basic hygiene. It is like brushing your teeth, but for the code.
I wrote a blog post on the topic called Nine Simple Steps for Better Looking python code. Feel free to check it out.
Step 1: configuration files
Add these files to the root of your repository.
- setup.cfg - configuration for flake8 and mypy.
- pyproject.toml - configuration for black.
Step 2: requirements
Install the required libraries with
pip install black flake8 mypy
Step 3: black
There are 100500 ways to format the code. Formatters like black or yapf modify the code to satisfy a pre-defined set of rules.
It is easier to read codebase that has some standards. When you work on the code for hours and need to switch a context between different coding styles, it drains “willpower energy” — no need to do it without a good reason.
Running
black .
will reformat all python files to follow the set of rules by black.
Step 4: flake8
Running
flake8
will not modify the code, but will check code for syntax issues and output them to the screen.
Fix them.
Step 5: mypy
Python does not have mandatory static typization, but it is recommended to add types to the function arguments and return types.
For example:
class MyModel(nn.Module):
    ....

def forward(x: torch.Tensor) -> torch.Tensor:
    ....
    return self.final(x)
You should add typing to the code.
- It makes it easier to read the code.
- You can use the mypy package to check arguments and function types for consistency.
After updating the code run mypy on the whole repo:
mypy .
If mypy found issues - fix them.
Step 6: pre-commit hook
Running flake8, black, mypy manually all the time is annoying.
There is a tool called pre-commit hook that addresses the issue.
To enable it - copy this file to your repo: .pre-commit-config.yaml.
You need to install the pre-commit package on your machine with:
pip install pre-commit
And initialize with:
pre-commit install
You are good to go.
From now on, on every commit, it will run a set of checks and not allow the commit to pass if something is wrong.
The main difference between the manual running of the black, flake8, mypy is that it does not beg you to fix issues, but forces you to do this. Hence, there is no waste of “willpower energy.”
Step 7: Github Actions
You added checks to the pre-commit hook, and you run them locally. But you need a second line of defense. You need Github to run these checks on every pull request.
Way to do it is to add file .github/workflows/ci.yaml to the repo.
There are lines:
    - name: Install dependencies
      run: |
        python -m pip install --upgrade pip
        pip install -r requirements.txt
        pip install black flake8 mypy
    - name: Run black
      run:
        black --check .
    - name: Run flake8
      run: flake8
    - name: Run Mypy
      run: mypy retinaface
that tell GitHub what to check.
I also recommend to give up the practice of pushing the code directly to the master branch.
Create a new branch, modify the code, commit, push to Github, create a pull request, and merge to master.
It is a standard in the industry, but it is exceptionally uncommon in the academy and among Kagglers.
If you are not familiar with these tools, it may take more than 20 minutes to add them and fix errors and warnings.
Remember this time. In the next project, add these checks in the first commit, when no code is written. From that moment, every small commit will be checked, and you will need to fix at most a couple lines of code every time: tiny overhead, excellent habit.
I would also recommend reading a book Atomic Habits: An Easy & Proven Way to Build Good Habits & Break Bad Ones. It talks about small changes in your behavior that improve productivity and the quality of your life.
III: +20 min: Create good readme.
Good readme serves two purposes:
- For yourself: you assume that you will never use this code, but “never say never.” You will, and you will not remember what was happening here. Readme will help you.
- For others: Readme is a selling point. If people are not able to tell the purpose of the repo and what problems it addresses, they will not use it. All the work that you did will not have a positive impact on others.
For machine learning repositories, the bare minimum is:
- An image that tells what the task was and how did you solve it. No words should be required. Most likely, after working on a problem for weeks, you have 100500 pictures. They are just not a part of the Readme. Fix it.
- Where to put the data.
- How to start training
- How to perform inference.
If you need to write 100500 words to describe how to run training or inference it, it is a red flag. You need to refactor your code and make it more user friendly. People often ask - how can I become a better programmer? This is the exercise that helps. You will need to rewrite your code. Try to look at your Readme from the eyes of someone else.
It is also a great exercise that will help develop a habit of looking at the product from the user’s point of view.
Famous: “Customers come first.”
Example: For retinaface, I wrote a wrapper over a model that hides details of the postprocessing.
Postprocessing is straightforward hard, but it does not add value to people that do not care about it => users should be able to hide it.
Readme created at this stage will be reused later when we will build a library.
IV: +20 min. Make it easy to use your trained model.
I guess you write
model = MyFancyModel()
state_dict = torch.load(<path to weights>)
model.load_state_dict(state_dict)
to load pre-trained weights to the model.
It works, and steps are clear, but it requires weights on the disk and knowing where they are. A more elegant solution is to leverage the torch.utils.model_zoo.load_url function in torchvision and similar in TensorFlow or Keras.
We can do:
from retinaface.pre_trained_models import get_model

model = get_model("resnet50_2020-07-20", max_size=2048)
If weights are not on the disk, they are downloaded from the internet and cached on the disk. The model is initialized, and weights are loaded.
This is user friendly, and that is what you see in torchvision and timm libraries.
Step 1: host weights of the pre-trained model
This was the biggest blocker for me. Where can I put weights for the model if you do not want to deal with AWS, GCP?
Apparently, there is an excellent solution, I would say a loophole. You can put weights to the releases at GitHub.

The limit is 2Gb per file, which is enough for most Deep Learning models.
Step 2: write a function that initializes the model and loads weights
In my case:
This functionality will be leveraged when we will build Colab Notebook and WebApp.
V: +20 min. Make a library.
In this step, you lower the entry point to use your model. The goal is to perform predictions without
git clone retinaface
Step 1: add necessary dependencies to the requirements.txt
You can use
pip freeze > requirements.txt
or update it manually.
Step 2: change the file structure of the repo
Create a “main folder,” in my case, called “retinaface,” the same as the repository.
- Move all the important code there.
- Do not move helper images, Readme, notebooks, or tests there.
Doing it manually and updating all imports would be painful. PyCharm or similar IDE will do it for you.
This is a common way to structure code in the repositories.
I hope, in the future, you will follow this pattern from the beginning. If you want something even more structured, check out Cookie Cutter package.
Step 2: add config file.
- Add setup.py to the root of the folder with the content similar to setup.py
- Add a version for the package. In my case, I added it to the init file of the “main” folder.
Step 3: create an account at PyPI
If you do not have an account at PyPI, it is time to create it.
Step 4: build a library and upload to PyPI
python setup.py sdist
python setup.py sdist upload
That is it. Your repository is a library, and everyone will be able to install it with:
pip install <your_library_name>
If you check the package’s page at PyPI, you will see that it uses Readme that you have in the repo to present the project.
We will use the functionality of this step for Google Colab and for a Web App.
VI: +20 min. Create a Google Colab notebook.
It is a good practice to add a Jupiter notebook to the repository to show how to initialize the model and perform inference. Example.
We can do better.
We enabled a “fancy” model initialization and the pip install magic in the previous two steps. Let’s leverage this.
We can create a Google Golab notebook.
Now, the only thing that someone needs to play with your model is a browser! More people will be able to check it out.
Do not forget to add a link for a notebook to your readme and update the version at PyPi.
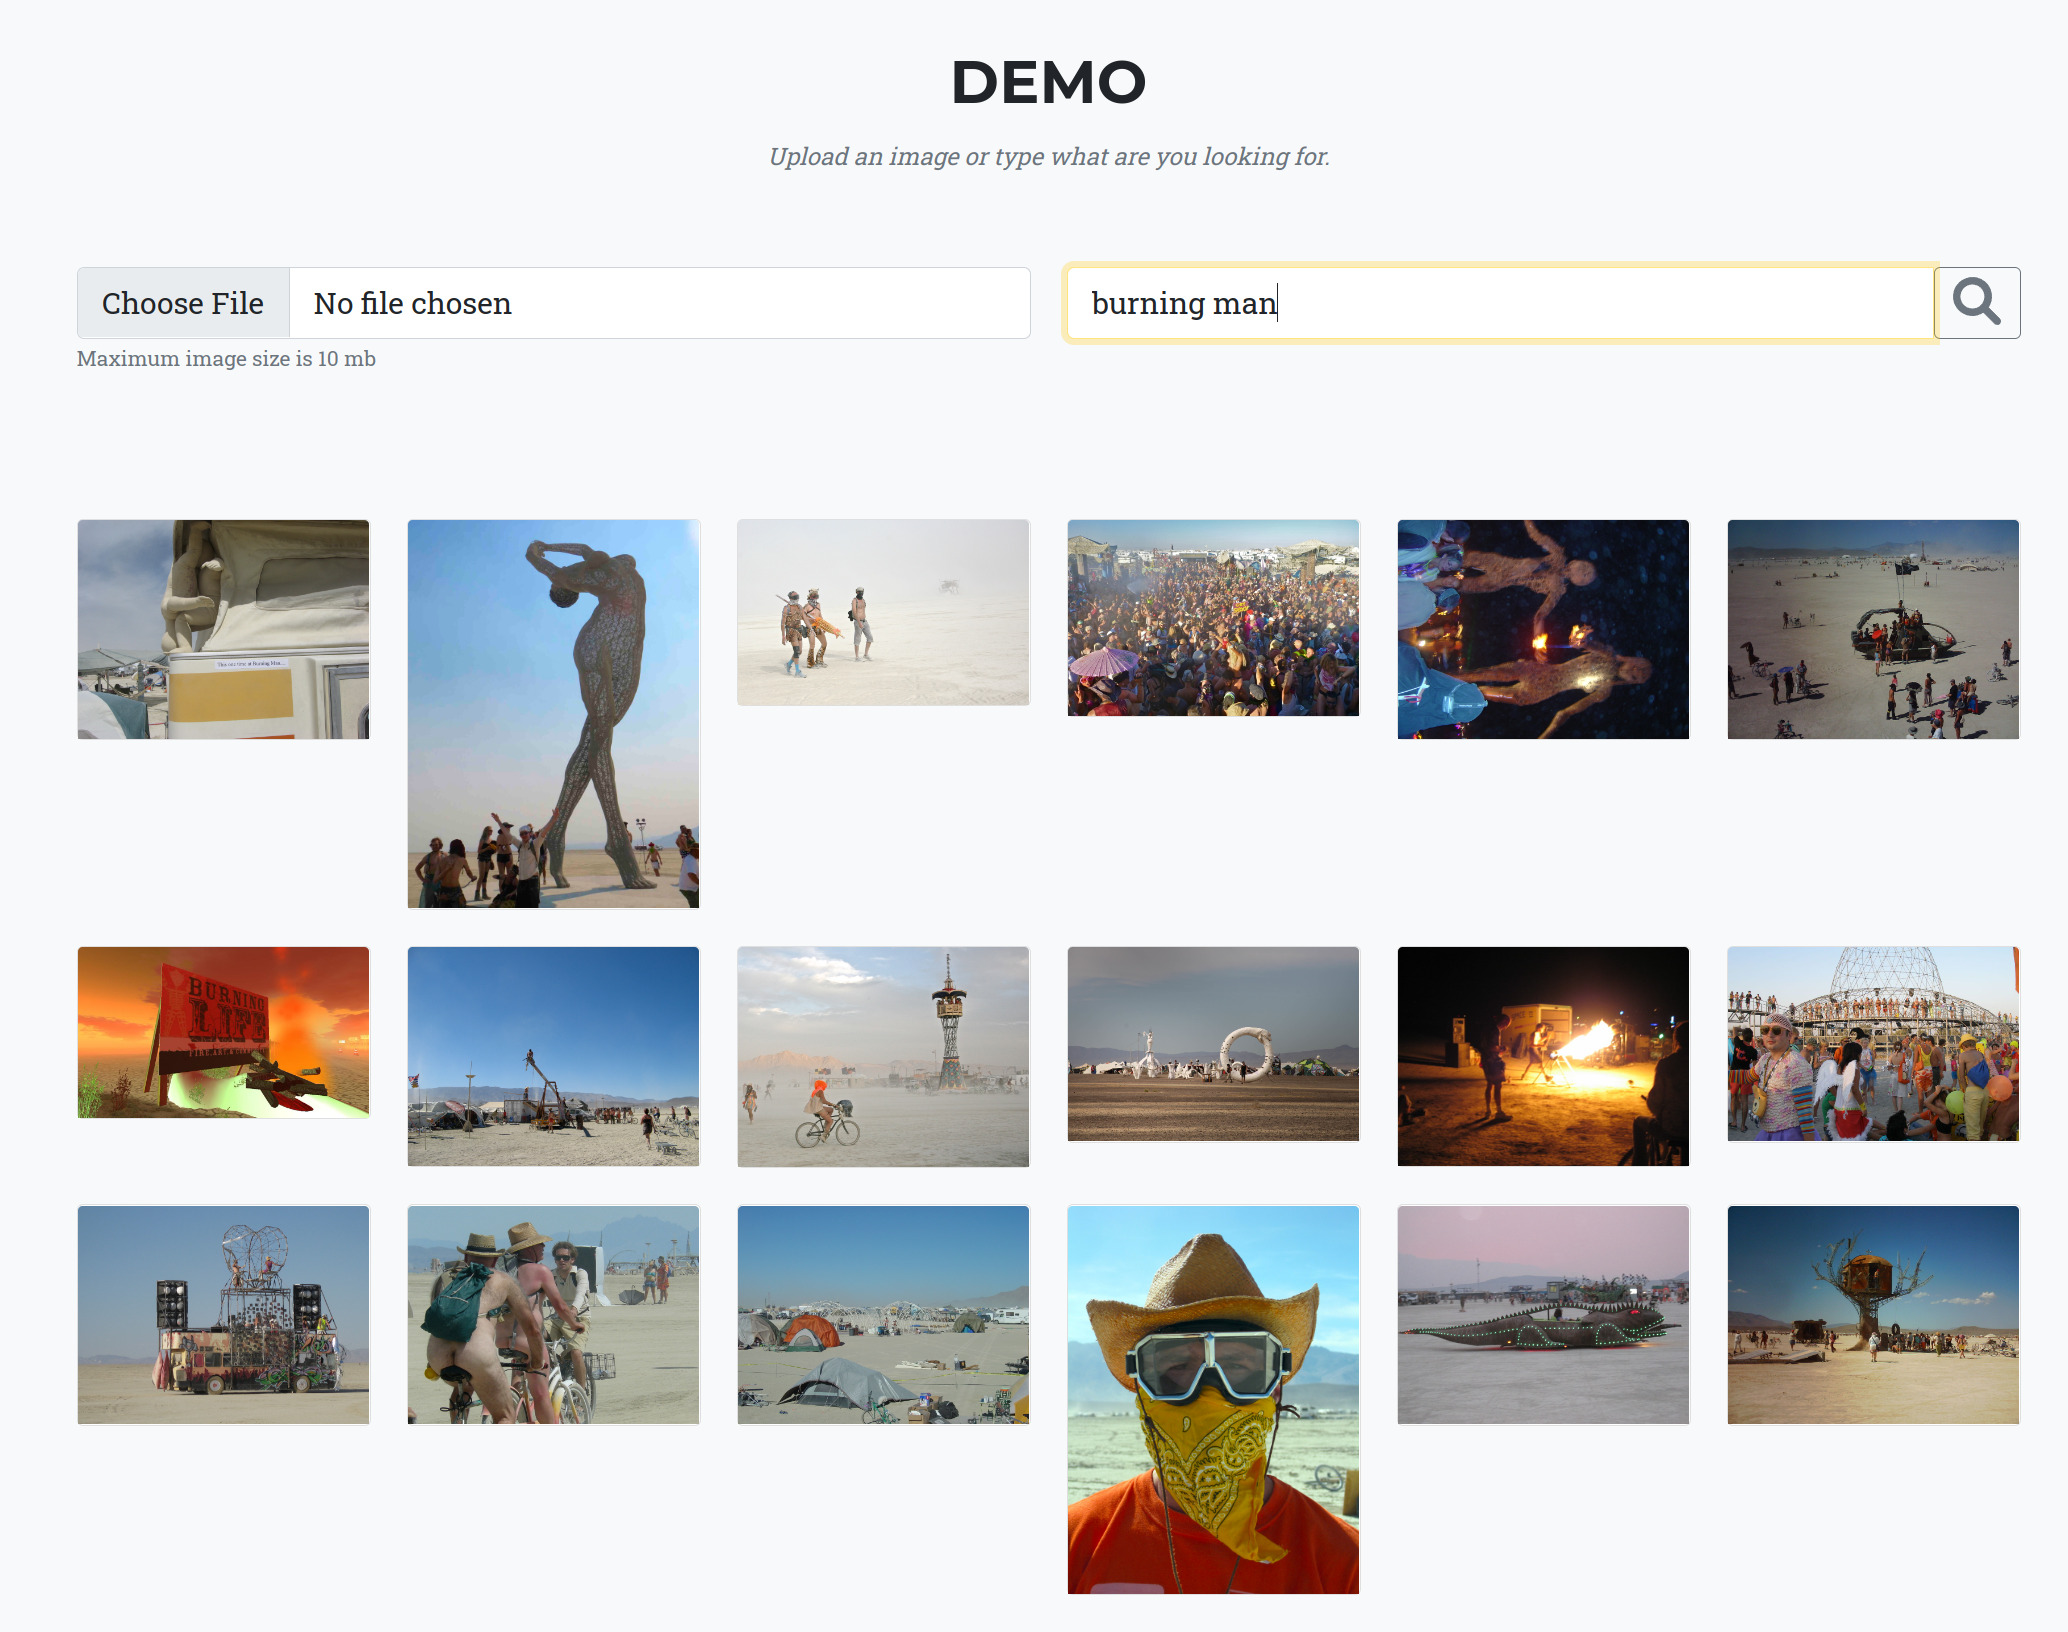
VII: +20 min. Create WebApp
Many Data Scientists assume that building a web app is a complicated procedure that requires specialized knowledge.
This assumption is correct, the web app for a complex project requires skills that Data Scientists may not have.
Building a simple web app that demonstrates the model is easy.
I created a separate github repository for a web app. Still, you can do it in your repository with the model.
A blog post that describes details: How to Deploy Streamlit on Heroku
Step 1: Add code for the app.
"""Streamlit web app"""

import numpy as np
import streamlit as st
from PIL import Image
from retinaface.pre_trained_models import get_model
from retinaface.utils import vis_annotations
import torch

st.set_option("deprecation.showfileUploaderEncoding", False)


@st.cache
def cached_model():
    m = get_model("resnet50_2020-07-20", max_size=1048, device="cpu")
    m.eval()
    return m


model = cached_model()

st.title("Detect faces and key points")

uploaded_file = st.file_uploader("Choose an image...", type="jpg")

if uploaded_file is not None:
    image = np.array(Image.open(uploaded_file))
    st.image(image, caption="Before", use_column_width=True)
    st.write("")
    st.write("Detecting faces...")
    with torch.no_grad():
        annotations = model.predict_jsons(image)

    if not annotations[0]["bbox"]:
        st.write("No faces detected")
    else:
        visualized_image = vis_annotations(image, annotations)

        st.image(visualized_image, caption="After", use_column_width=True)
Less than 40 lines.
Step 2: add config files
You will need to add files:
- setup.sh - you can use this file without changes.
- Procfile - you will need to modify the path to the file with the app.
Step 3: add requirements.txt
Step 4: register at herokuapp
Step 5: push the code
heroku login
heroku create
git push heroku master
You are live. Check out the example for https://retinaface.herokuapp.com/
VIII: +4 hours. Write a blog post.
Many people undervalue their work. They assume that if they know how to do something, everyone knows it. It is not the case.
One man’s trash is another man’s treasure.
Your article will help other people and improve your career opportunities.
I work at Lyft, Level5, and apply Deep Learning techniques to self-driving problems. Before Lyft, I worked at the debt collection agency TrueAccord. You can read about my job search in the blog post: “Shifting Careers to Autonomous Vehicles.”
One of the reasons I was able to do this career shift is because I shared my knowledge in blog posts and meetups. This attracted the attention of recruiters and hiring managers.
Worked for me - will work for you.
For machine learning, I would recommend writing the text that covers:
- What was the problem?
- How did you solve it?
If you read till this moment and found this article useful, you can say “Thank you!” by writing a blog post about one of the machine learning problems that you faced and how you solved it.
Example:
- Challenge: IEEE’s Signal Processing Society - Camera Model Identification
- Blog post: Forensic Deep Learning: Kaggle Camera Model Identification Challenge
IX: Days. Write a paper that describes your solution to the machine learning competition.
Even if your paper is not a breakthrough, it will be published and have value to other people. Writing academic papers is a different skill, and you may not have it now. Not a problem. You can collaborate with people that know how to write in an academic format.
Examples:
- Deep Convolutional Neural Networks for Breast Cancer Histology Image Analysis 100 citations.
- Automatic instrument segmentation in robot-assisted surgery using deep learning 100 citations.
- Paediatric bone age assessment using deep convolutional neural networks 70 citations.
- Ternausnet: U-net with vgg11 encoder pre-trained on imagenet for image segmentation. My favorite example. The idea was trivial. This work was written for fun as an addition to the code at GitHub. We made a mistake and did not submit it to the conference. We assumed that no one would be interested in. It is my most cited work.
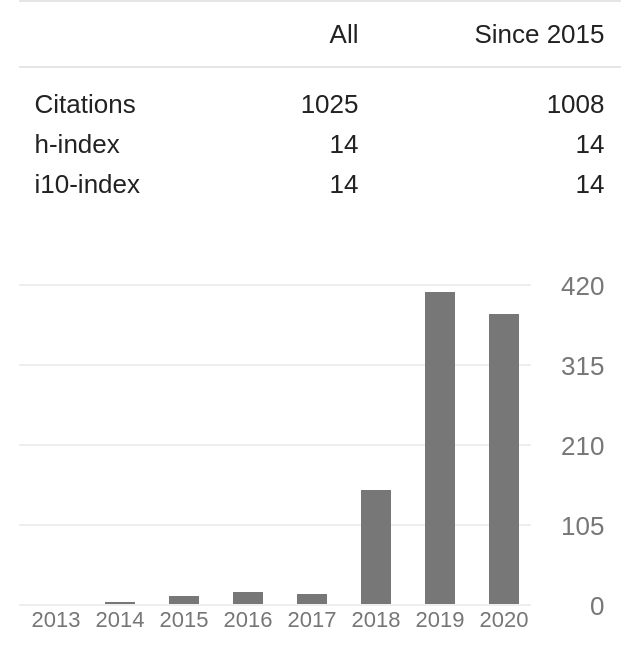
Just look at my Google Scholar. Bump in the previous few years comes from the papers that were summarizing participation in different machine learning competitions.
Besides - your paper will not be alone. It comes in a package with:
- Github repository that has clean code and a good readme.
- A library that non-machine learning people can use.
- Colab notebook that allows fast experiments with your model in the browser.
- WebApp that engages the non-technical audience.
- The blog post that uses human being language to tell the story.
It is not a paper anymore, it is a cohesive strategy that shows your “ownership” and “communication.” Both are crucial for your career growth, but I will talk about it next time :)


Comments