Lurking Fear: El Capitan, trip report
Source: https://www.bivy.com/routes/us/California/lurking-fear–5789447656308736
Following the fresh tracks, I want to write a text, which could be a helpful artifact if I climb again, as technical details will easily refresh my memory.
At the same time, I would like to capture the mood so that in 50 years, I would like to share it with my grandkids.
So, this text attempts to merge the unmergeable and combine a technical report with a story of what was, wasn’t, or should have been.
The text is lengthy and filled with many details and photos. It’s the kind of text I would have wanted to read before embarking on such an adventure. (If any terms are unclear, let me know, and I’ll elaborate.)
Short version
From October 12th to 15th, 2023, Anton Karnup and I tackled the Lurking Fear route on El Capitan.
Long version
Lurking Fear is a vertical 2000-foot-tall wall in Yosemite Valley.
This was our first successful climb together and my first big wall.
Previously, we attempted a couple of Californian peaks, but the weather did not cooperate both times.
In June, along with Dmitry Sizov, we tried the North Palisade via U-Notch, and in August, with Ya Yang, we attempted Mt Tyndall.
Both times, we spent a couple of days approaching the route, and the actual climb was expected to be relatively quick and should be completed within a day. But bad weather whispered in our ears: “Next time.”
Anton and I discussed our experiences and discovered that he had extensive big-wall climbing experience, which I lacked. However, I had a strong desire to try.
Big Wall climbing is when you tackle a wall over several days, with overnight stays on ledges or a portable platform you bring along. Apart from that, you haul water, food, and sleeping gear. A unique twist to the experience is managing bathroom breaks.
We remembered the conversation, and in September, Anton suggested we try the Lurking Fear route on El Capitan.
According to the book, “Yosemite Big Walls: The Ultimate Guide,” Lurking Fear falls into the beginner category of big wall climbing.
Moreover, the allure of climbing the legendary El Capitan was tempting.
I had known about this wall long before moving to the US, and in part, my decision to pursue graduate school in California was the proximity to Yosemite.
The wall gained widespread recognition outside the climbing community with the release of the documentary “Free Solo.” In it, Alex Honnold climbs the FreeRider route, located slightly to the right of Lurking Fear. While we had everything under control and a wide margin for error, he climbed without any safety gear, demanding absolute perfection.
The documentary, though real, feels like a thriller. You know it’ll end well, but your palms sweat throughout. If you haven’t seen it, I highly recommend it.
Naturally, I couldn’t decline Anton’s offer, and we began preparations.
Previous experience
Back in St. Petersburg, as part of the Bars alpine club, I went on climbs in the Khibiny Mountains and the Caucasus, but I hadn’t been involved in mountaineering since.
In California, I did some rock climbing, both sport and trad.
My sport climbing record stands at 5.11d, and multi-pitch trad at 5.10a.
https://www.8a.nu/user/vladimir-iglovikov/sportclimbing
Over the past year, I’ve shifted my focus to Kite Surfing and weightlifting.
Anton has had many alpine ascents and big walls.
I believe I am slightly better at sport climbing, but he is stronger in trad, especially in crack climbing, which is crucial for Yosemite.
Preparation
In the text, I’ll use two climbing terms:
Free Climbing (trad climbing) — The rock serves as the point of support. You look for hand and foot holds on the rock. Occasionally, you place protection points (cams, nuts) on the wall, clip the rope into them, and continue climbing. This means the point of support (rock) and the protection point (cams) are distinct entities. The advantage is that you climb quickly. The downside is that your skill level defines your climbing limit.
Aid Climbing: Both the rock and your protection points serve as your support. In simple terms, you can grab anything within reach. For instance, you’d place a cam in a narrow crack you couldn’t hold onto, hang an aider, rest, climb, and continue the process.
The advantage is that your climbing limit is only restricted by the presence of cracks where you can place gear. If you’re placing bolts, the sky’s the limit. The downside is the significantly slower pace.
Big Walls are typically climbed in the aid style by mere mortals like us. I had only tried this style over a decade ago and not on such challenging walls.
The ascent was planned for October, the idea conceived in September, leaving us with a month.
We made two trips to Castle Rock Park.
First, we recalled how to aid climb, and I learned how to haul a bag.
The second time, we practiced assembling and disassembling the portaledge, especially while hanging.
We also did a practice climb on the Black Wall at Donner Pass. It was three pitches without an overnight stay on the wall but with hanging belays, aid climbing, hauling, gear transfers, and rope management — a complete simulation.
It also became clear that I consume a lot of water, so instead of the planned 5 gallons, we’d need 6.
All the communal gear, including:
- The portaledge
- Ropes
- Haul bag
- A pulley for hauling
- Nuts and cams
- Skyhooks and Camhook
- CT Tricky device
- Ingenious water bottles
…were provided by Anton.
(Special attention to the CT Tricky. I highly recommend it for this route. Without it, aided pitches would be quite challenging and might even become impossible, forcing a retreat.)
Skyhooks
Source: https://www.facebook.com/photo.php?fbid=10161169024047552&set=a.10153810215727552&type=3
For those unfamiliar, skyhooks are metal hooks, you attempt to latch onto rock outcrops. They aren’t considered protection points, and falling on them is inadvisable. They can easily dislodge if pulled upward or sideways. Sometimes, they’re taped or bandaged to the rock for added stability.
Cams (Camalots)
Source: https://commons.wikimedia.org/wiki/File:Camalot_C4_number_5_placed_in_a_crack.jpg
Cams expand in cracks and serve as solid protection points, unlike skyhooks or cam hooks. According to the label, a medium or large cam can bear a load of up to one and a half tons, like my Mazda 3 car.
However, that’s if the cam is placed well. A poorly placed one can be pulled out by hand or light force. Often, you won’t know how securely it’s placed, especially if you’re placing it blindly around a corner.
Furthermore, even if you’re confident in your placement, hanging on such a device 80 feet (equivalent to an 8-story building) above your last protection point (as I’ll have later) is psychologically daunting.
Basically, you need to calmly negotiate with your self-preservation instinct and come to a mutual agreement.
Bolt

I’ll frequently mention the term bolt. Bolts are considered very reliable anchors, both for falls and for hanging.
Throughout my life, I’ve never ripped a bolt out, so as long as it’s not old and rusty, I trust it fully.
Additional Purchases
I also had to purchase additional gear:
- Approach shoes: You need ones that work both for walking and climbing. They’re not alpine boots but are a cross between climbing shoes and hiking boots. I wasn’t aware of their existence. They’re perfect for Big Walls. Bought La Sportiva TX4. I wouldn’t recommend them. They’re comfortable but fell apart after the ascent. I returned them for a refund today. However, I endorse the approach shoe concept and will purchase a new pair.
- Harness: For Big Walls, a regular harness won’t suffice. You need one with a broad waist belt and numerous reinforced loops for gear. I bought the Metolius Safe Tech Waldo. I wouldn’t recommend it. It’s generally good, but the belt buckle comes undone, and the gear loops on the left side tend to slide to the back, which is inconvenient.
- Mini backpack with loops: We got the Metolius Climbing Multi-Loop Big Wall Gear Sling. It’s lightweight, compact, and has a convenient attachment point for a radio. Suitable for any route type. Recommended.
- Radios: We took the advice from the HowNot2 channel and chose the Rockie Talkie and liked them a lot. They come with an inbuilt carabiner and can be attached to the backpack strap. The rubberized coating makes them less fragile. Plus, unlike other radios with constant static and chatter from other people, these didn’t have any of that. Recommended.
- Aiders: I hadn’t climbed with aiders before. I had a few climbs in Russia using Kurkonogi (Russian aiders). Krukonogi isn’t available in the US, and everyone uses normal aiders. Initially, I ordered from Scotts Wall Gear. They charged my card but haven’t shipped the order yet. Ultimately, I used two Yates Big Wall Ladder 6-Step Aiders. I have mixed feelings about them. They’re good, but I believe there are better options out there.
- Headlamp: I needed a bright one since there’s a risk of ending up in the dark. With shorter daylight hours, it’s not just a risk but a plan. I chose the Petzl Actik Core 600 Lumen and liked it. It’s not necessary for casual evening outings but vital for climbing after sunset. Recommended.
- Phone: I wanted to capture the ascent with photos. Coincidentally, the iPhone 15 Pro had just been released. I was enticed by the promise of stellar photos and bought it.
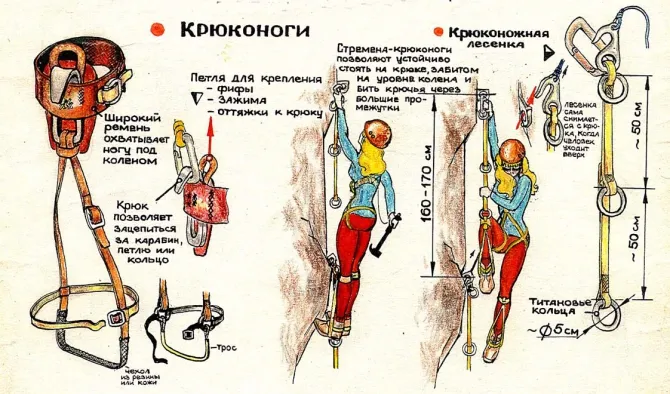
Krukonogi (Russian aiders)
Source: https://risk.ru/blog/202389
Krukonogi has two parts:
- Aiders that is a chain of rings.
- Hooks near the knees that you use in these rings or any carabiners.
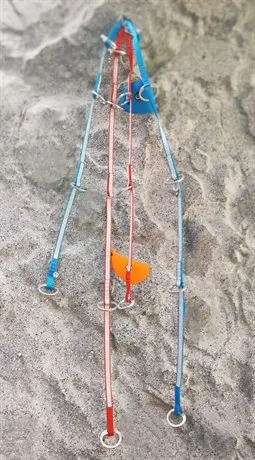
Aiders part of Krukonogi — a chain of rings that could be attached to the carabiner
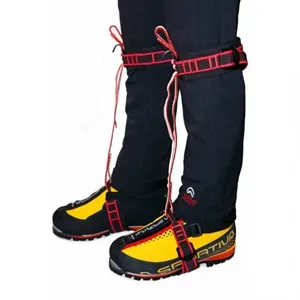
The hook part of the krukonogi. A hook near the knee is used on the rings from the ring ladder or carabiner.
Advantages of Krukonogi:
- placing the hook into the ring or carabiner is faster than a foot into the aider or etirers
-
on the vertical and positive slopes, you can reach about 1 foot higher Disadvantages:
- Shifting to free climbing and back is more challenging.
Ascent
Wednesday
On the evening of October 11th, we headed towards Yosemite and camped just outside the park. The rules for staying overnight in the park are peculiar: rangers chase away those attempting to sleep inside without permission. However, a mere 100 meters outside, they don’t mind. They even recommend doing so.
Thursday
Objectives:
- Carry our gear to the base of the route.
- Climb the first three pitches.
- Haul up the bag.
- Hang the ropes down to the ground and leave them.
- Descend and enjoy some beer.
- Sleep in the car.
It’s worth mentioning that during this week, park workers were combating dry trees by extensively burning them. The surroundings weren’t just slightly smoky; they stung my eyes, and my watch indicated that my blood oxygen level (Pulse OX) had dropped.
*This isn’t morning fog; it’s intense, eye-stinging smoke.
The approach to the route is comfortable, taking just an hour from the car. We planned to do it in two trips. However, Anton’s friends, Jerome and Emil, kindly offered help, so we managed in one go.*
There are places on the approach where climbing is necessary. Fixed ropes are in place. It’s hard to see here, but there’s a rope in the center, and starting without it, especially with a backpack, is quite tricky.
That’s me. Notice the white sky on the right? Without the smoke, you’d see trees and cliffs on the other side.
At the base of the route, we met the valley legend Steve Schneider (Shipoopi). He was soloing a route about 100 meters to our left, aiming to finish by winter.
First Pitch
We overlooked a detail in the description about hooks, which forced us to pull up the missing gear.
Anton approaching the first belay point.
Second Pitch
Again, Anton is climbing on bolts.
Start of the second pitch. The rock’s like a mirror. Yet, some people free climb it here.
Third Pitch
Two options for progression. No one takes the right one; we didn’t either.
This one was mine.
The start involves bolts. I managed the first four, and then it got interesting. I couldn’t reach from the fourth to the fifth, even with an extender (CT Tricky). A very height-dependent move. After about ten minutes, I found the right combination of stepping and micro-swinging amplitude to succeed.
I got very curious about how climbers shorter than me navigate this section.
The next move was even more intriguing, described as “12d or 5.10A0.”
How it looked in practice: there were micro holds that, when touched (but not gripped), allowed some balance, enabling me to ascend higher on the aider.
A foot above my stretched hand was a hold, but this foot seemed impassable.
First idea: I tied a skyhook to my self-belay and tried to throw it precisely to latch onto the hold. Theoretically, this idea could work, but I’m not trained in skyhook tossing. So, I moved to plan B.
Second: Try balancing in climbing shoes. Anton hauled them up, and I switched shoes and tried. I did not have a third idea, and I’m glad that one worked. The climbing shoes improved my balance, letting me ascend higher. Then, in a semi-dynamic move, I switched from the aider to the minuscule hold and hooked a skyhook onto a large hold I aimed for.
After that, there’s a straightforward section of 5.9. I intended to switch to free climbing, but it didn’t pan out. Continued aiding. The aiders tangle around your feet. You have lots of gear, and, probably the most important, psychologically, switching from relaxed hanging to less confident climbing is hard.
End of the third pitch. We had to leave all our gear on these two bolts, hang the ropes to the ground, and head down.
At the same time, a group of three descended past us. They had climbed the first six pitches in a day, decided they were moving too slowly and turned back.
This surprised me. The guidebook recommends climbing seven pitches on the first day. They were on track.
According to Shipoopi, from observing the base of the route for a few months, roughly half the groups withdrew before finishing.
View from the ground of our hanging ropes. From this spot, our belay station with the bag, platform, and other gear isn’t visible; it’s 380 feet above.
We met a guy starting the route alone at night when we descended.
As we later read in the news, this was 25-year-old Oliver Tippett, another climbing legend from Britain.
He was going for an onsight (never climbed this route before) speed climb.
He finished in 17 hours and 26 minutes (compare that to our 3+ days).
After that, we enjoyed beer, pizza, and a good night’s sleep before our decisive push.
Friday
The task for the day: Ascend to a comfortable camping spot.
The guidebook suggests that those starting from the end of the third pitch (like us) climb another 7–8 pitches, and from there, a repel to a ledge where two people can fit. This ledge is known as the “Motel Zed.”
By 8 a.m., we had ascended to the start of the route. While not the end of the world, it is an area for improvement. The days are short; it’s better to start climbing at dawn, which is at 7 a.m.
Another team was already climbing, a man and a woman. She was leading and was almost at the first belay station.
To get to where we left our gear, we had to ascend 380 feet using ropes.
Anton went up first. When it was my turn, I realized a gap in my skillset. Throughout my climbing career, I always led climbs. Therefore, I never mastered the jumaring technique.
In theory, I understand and can do it, but it’s energy-consuming. This method works fine for short distances, but 380 feet on a vertical wall is exhausting. Ideally, this process should feel like a rest.
Our ascents, gear setup, and preparing the ropes for Anton to climb and for me to belay took an hour. It felt like a long time and another area for improvement.
We began the climb at 9 a.m.
Pitches 4, 5, 6
Anton led these. I heard no swearing; he combined pitches 5 and 6 into one. The climb started with bolts and skyhooks, then along a crack.
Shipoopi is working on his climb.
Valley in smoke
Seventh Pitch
I led this pitch. The rope was mostly horizontal, implying a traverse. Traversing in big walls is quite different from free climbing.
In free climbing, you lead, clipping into bolts or placing the protection. The second climber follows and removes the gear. This is exactly how I climbed my last traverse on the “Sedona Scenic Cruise” route three years prior with Galina Malovichko.
In this scenario, there are several protection points between you and the belayer. If you fall, you don’t drop far.
In big walls, it’s the opposite. There shouldn’t be any intermediate points between you and the belayer. The main rope isn’t clipped anywhere during the traverse until you start climbing upwards.
The lead climber uses two personal anchors. They clip into the first bolt with one, then reach to the second and clip it with the other. They unclip the first from the initial bolt, reach the third, and so on.
If you fall, the nearest point is the belay station, and you swing the full length of what you’ve climbed.
The start of the seventh pitch. Two bolts are between me and the anchors, but the rope is not clipped into them.
What if you can’t reach from one bolt to the next? You place the gear in a crack — a cam or a nut.
And if there’s no crack? You use a skyhook.
This is the exact situation I found myself in. I moved four bolts away from the anchors, with no intermediate points between me and the station. I couldn’t reach the fifth, so I had to place a hook and trust it wouldn’t give way.
In total, I had to traverse about 20 meters in this manner.
Very exhilarating.
Meanwhile, cheerful shouts echoed from below.
Remember how I stretched somewhere on the third pitch and wondered how those shorter than me lead that move?
The woman we saw at the start of the day reached that spot. She couldn’t reach far enough, so she tackled the section using the “pendulum” technique, swinging with a significant amplitude of about 12 feet. She attempted this more than ten times with childlike glee and shouts of “yippee,” reminiscent of childhood swings.
But these swings were 260 feet above the ground. For visualization, imagine a 26-story building and someone attached a swing at the attic level. You run along the wall with a joyful scream and try to swing as far as possible. She was quite tenacious and managed it after several attempts.
Also, on the seventh pitch, Anton dropped the belay device.
For the rest of the route, we climbed using mine, being extra cautious not only with the pulley to haul the bag (if it were dropped, we’d have to halt the ascent) but also with the belay device. Had the remaining one been dropped, we might not have turned back, but the excitement level would have notably surged.
Eighth Pitch
The start was straightforward.
I led and once again encountered a new technique, which I had to adapt to without any prior familiarity.
The second part of the pitch is an 80 feet offwidth crack about 4 inches wide.
Offwidth refers to a crack wider than a fist but narrower than a “chimney.” (A chimney is a crack you can fit into entirely and ascend by pushing against both sides.)
If you’re curious about the most “weird” type of climbing, it’s where the offwidths are.
However, we didn’t need to free climb; aid climbing changed everything.
A 4-inch cam fit well into this crack, which was good news. But we only had two of them, which was bad news.
How to climb? A technique I suddenly got acquainted with is called “Cam Jumaring.”
You place the first cam, attach an aider, ascend, place the second cam, attach another aider, climb it, remove the first cam, place it higher, and so on.
Where are the intermediate protection points? Where do you clip the rope?
Nowhere, just like traversing on bolts horizontally. Here, it’s on cams that you keep moving vertically.
In traverse, you do this for “high style” and “because it’s the way to do it.” You do it here because you have no choice, and “life makes you adapt.”
If the cam you’re hanging on pops out, you fall — and fall far.
Eighty feet is like an 8-story building. If you fall, you drop to the last protection point and then fall that distance again: 2 * 80 = 160, like falling 2 * 8 = 16 stories.
Another thrilling pitch.
Ninth Pitch
Mine again.
The pitch wasn’t tough, rated 5.9; ideally, it should be free-climbed. That means leaving the extra gear with Anton, removing the aiders, and moving forward.
But! It was getting dark, my energy was waning, and I wasn’t keen on switching from slow, comfortable aid climbing to physically and emotionally demanding free climbing.
I chose safety over speed and climbed using aid. The pitch was not difficult, with a good crack and even some holds around it.
I finished in the dark.
It’s somewhat easier at night; the height isn’t as intimidating when you can’t see the ground.
The end of the ninth pitch is the “Pillar Of Despair,” the best ledge we encountered all day, about a square meter in size.
You couldn’t lie down to sleep on it, but after a whole day on hanging belays, the sensation of a horizontal surface where you could stand with both feet was sheer joy.
The guidebook suggests not bivouacking there but climbing 1–2 pitches higher and repelling diagonally to “Motel Zed.” However, we felt that perfection is the enemy of the good.
We set up a portaledge, a new experience for me. We secured the corners, a technique I didn’t know was necessary.
We prepared food, which meant boiling water on a hanging stove, and slept.
I was curious if I would roll off in my sleep. And if so, how far over the edge would I go before waking up? We slept in harnesses tied to the rope, ensuring safety. But still, if I had slipped off, it would’ve been a night-time, mid-sleep fall.
Sometimes, I fly in my dreams; this situation would have added a unique twist.
Fortunately, that didn’t happen, and I woke up right where I fell asleep.
Against the dark backdrop, or rather below, were the lights of fires.
Saturday
The goal was to reach a large ledge named Thanksgiving Ledge at the end of the 17th pitch, meaning if we climbed six on Friday, one of which was in the dark, we needed to climb eight today.
We woke up, had breakfast, and got ready. Again, for some mysterious reason, we started climbing at 9 a.m. The sun rises at 7, after all.
Tenth Pitch
Anton led. From a distance, it looked easy, but only from a distance. The two consequent moves Anton had to make on camhooks were impressive.
Eleventh Pitch
Anton led. While climbing, we heard cheerful shouts below us and saw the next group reach the Pillar Of Despair, where we had bivouacked two pitches below.
I thought it was the couple that had been two pitches behind us, but as I found out later, it wasn’t them; that couple must have bailed.
Twelfth Pitch
I led. Another traverse, but unlike the previous one, which had bolts, this one had rusty pitons. And when the hooks ended, there was a crack where cams could be placed.
Yes, the crack was good, but it was quite an experience to hang on a single cam 10 meters away from the last protection point.
I wasn’t scared, but I’d like to use the words “nervous” and “tingling” side by side.
From anchors, I climbed up to a roof with a piton underneath. After that, I placed a cam, followed by two more pitons, and then two more cams. I’m hanging on to the third one. Everything I clipped, I removed after passing. This is precisely what “high style” aid climbing looks like on traverses.
From Anton’s perspective, it didn’t look that dramatic. I’m about 400 meters above the ground, higher than the Eiffel Tower.
It wasn’t that hard. Yes, it’s unsettling to be several meters away from the belay and hanging on 1–2 pieces of your gear. But it probably felt easier than the previous traverse on skyhook.
Thirteenth Pitch
I led again.
A third of the pitch was 5.12b, another third 5.8, and the last third 5.3.
I aid climbed the first part, a good finger-width crack, for which we had plenty of gear.
Then, I had to transition to free climbing. And again, the same story — it’s just about 25 feet, the aiders get tangled around the legs, a cam popped out of the crack prematurely. Basically, I chickened out and aid climbed, which was a small but time-consuming issue (and, again, an area of improvement for me).
While climbing the 5.8, a female team caught up with us. First, Kate sped past me, followed by Michele.
By the time I reached the belay, the first lady had already taken off, and the second one was preparing to ascend.
These strong women work for the local Search and rescue. They had a day off and decided to stretch their muscles by climbing our route in a single day.
They started climbing at 8 a.m. I didn’t ask, but most likely, they are also some legends of Yosemite Valley.
From the end of the 13th pitch, there was a feeling that life was getting back on track, and the vertical part was over, probably because there was a ledge where we could stand on both feet.
It’s the first time today we’re standing on two feet, not hanging on the wall.
Fourteenth Pitch
Anton led, and he free-climbed. He finished in less than half an hour. Compared to the 1.5–2.5 hours each of us took before, this was impressive and gave us hope that we’d complete another pitch before dark.
Fifteenth Pitch
It was getting dark.
Anton led again. While we were handling the rope, his headlamp suddenly went out. Everyone recommends bringing spare headlamps on a climb, and it’s advice you shouldn’t ignore! A backup headlamp is crucial.
The beginning of the pitch was 5.6, which he breezed through without placing any protection. Then came the 5.10c section and the sunset (7 PM). Free climbing was over, and aid climbing began. We sent up some of the gear, especially the hooks he’d left behind, to speed things up.
Again, it took 1:30 hours for this pitch.
Sixteenth Pitch
I led, and it was already dark. My headlamp was acting up and wouldn’t switch to maximum brightness, only working on a medium setting. It probably didn’t slow me down much, but it would’ve been better without this issue.
I climbed 5.6 + 5.10b, wearing climbing shoes. I free climbed the 5.6 without placing gear, and aid climbed the 5.10b. I strongly felt that this pitch could and should be free-climbed in the daylight, but in the dark, I wasn’t enthusiastic about the idea.
Seventeenth Pitch
The last pitch for Saturday, at the end of which awaited a ledge and a cave.
Anton led.
The first section was an offwidth 5.11d). Similar to what I had on the eighth pitch, where I had to move two 4” cams, one above the other.
The challenge was that this crack was slightly wider, requiring two 5” cams. We only had one.
With some magic of climbing, Anton made it up, losing a water bottle along the way (which I later picked up). And then, there was the magnificent ledge with a cave named Thanksgiving Ledge, which we had been aiming to reach.
I got to it just after midnight. So, the last three pitches took 4.5 hours.
Thanksgiving Ledge
A massive ledge with a cave, so spacious that we slept without harnesses. For this bivouac, we had brought along some beer and snacks.
Our exhaustion was evident, leading to some oversight. When I’m extremely tired, I snore. Due to the cave’s acoustics, the snoring was amplified. This meant Anton slept poorly, as sleeping inside a running tractor wasn’t ideal. At the same time, I had earplugs specifically for this situation, and we both knew about them.
By the way, this wasn’t my only oversight of the day. Up to this point, I had dropped two slings and one carabiner. I don’t recall ever losing gear before, but here, I lost three items in one day.
Sunday (the last day)
We woke up, had a snack, and realized we had significantly more food than needed. We also had ample water, so we left one gallon in addition to the water left by previous groups.
Eighteenth Pitch
Another blunder.
The end of the 17th pitch and the beginning of the 18th are in different locations. We saw two anchor bolts to the right of the cave, where the number 17 is marked on the map. The fact that there is no two bolt station in the topo didn’t alarm us. The rock not matching the description didn’t either. We didn’t think to walk around and check the surroundings. We also overlooked that pitches from a big ledge seldom have bolted anchors.
So, Anton started climbing from there. A few meters above the anchor, a foothold broke off, causing him to fall. Thankfully, he wasn’t injured, but it was surprising to encounter such an issue on such a solid and popular route.
On his second attempt, he climbed further and grabbed something, which gave way, sending several rocks tumbling down. While he didn’t fall, such moves could endanger the groups below.
We then wondered if we were climbing the right way. Turns out, the correct start was 25 feet to the left.
Descending from the wrong start cost us three cams. They are probably still there.
From the correct start, the climbing was smooth and straightforward, free climbed.
It’s worth noting that the guidebook listing all the bolts on the route, except these two, isn’t great. For those who will climb this route, be extra cautious here.
Regardless, the fact that we climbed the wrong way and thoughtlessly relied on those two bolts indicates that our overall fatigue was setting in, and our intellectual quotient was declining.
Nineteenth Pitch
I led, and it was straightforward. Halfway up the pitch, I placed a cam but didn’t clip it to the rope and lost a carabiner without noticing.
So, I climbed the entire pitch without intermediate protection and lost a carabiner. We would’ve left the cam behind if Anton hadn’t spotted it on the side.
Another oversight.
After that, it was straightforward: pack the gear, walk to the top, and hike down. Got to the top at 2 p.m.
At the center of Half Dome. Last year, I free-climbed it via the Snake Dike route, 5.7, over eight pitches.
The wall is in the background. That’s the one we climbed.
The descent from the top took 5 hours. At one point, we had to rappel using fixed ropes, which took slightly longer with one belay device compared to two. However, since we had plenty of time, this was seen not as a problem but as part of the adventure.
During the descent, we met a guy (sadly, I didn’t remember his name) who had climbed The Nose on El Capitan (32 pitches) that day, starting at 8 AM. I wished I’d taken a selfie with another living legend.
Conclusions
Surprisingly, aid climbing felt psychologically more comfortable than free climbing 5.9, despite the traverses, hook exits, night climbing, and overall height.
In aid climbing, you don’t hang onto tiny holds with the last protection point way below, trembling legs, trying to place gear, struggling to find it on your harness, losing strength, and the situation worsening with every second.
Clip in, hang, ascend the ladder, place a new piece, clip—hang, hang the ladder, and repeat a thousand times. It’s joyous, comfortable, and has no shaky legs.
On the other hand, the journey is constantly draining: hauling the bag, jumaring, moving with all the gear and two ropes.
This was my first big wall climb, and it went well.
However, after every adventure, it’s beneficial to analyze to improve future endeavors, no matter how minor the improvements could be.
I’m considering attempting The Nose in the spring. It’s also beginner-friendly. It’s 50% longer at 3000 feet, but there are no C2+ moves, and according to Anton, who’s climbed it twice, it’s more straightforward.
Covering more distance in a day; there’s room for improvement here.
Some optimizations could be attributed to climbing during a season with longer daylight hours. This time, we had exactly 12 hours.
If we break down the time spent on each pitch:
1.5–2.5 hours to lead with aid or 30 minutes of free climbing. Thirty minutes to haul the bag, the second to jumar, deal with ropes, and hand over gear. The hassle with hauling and ropes is memorable, but the primary optimization should focus on the lead climber’s speed.
Climbing Optimizations
- Get krukonogi, potentially increasing speed by 30–50%.
- Train to switch between free and aid climbing. I lacked in this area. When I did, it was slow, and I didn’t do it where I should have.
- Be more mindful about the gear taken on each pitch. Knowing the gear required, I wouldn’t have taken nuts, only two skyhooks, three cam hooks, and lighter 5” and 4” BD ultralights.
- Use only Totem cams in the [0.5–1] range, no BD, Metolius, or Aliens. Though the guidebook recommends taking three pieces of some sizes, this looks overkill. Two of each except 5” feel like good enough. I did not use half of the cams that we had. Less weight speeds your climbing, it is easier to look for gear on the harness, and passing gear to the other person is also faster.
- All carabiners should exclusively be HMS.
- Invest in a better big-wall harness. The one I had kept slipping, affecting gear distribution and making gear searches longer.
- Introduce color differentiation for cam carabiners. I bought 24 color carabiners for Anton’s cams. But it is far from enough. Improve crack climbing skills. Indoor climbing gyms have numerous challenging cracks, and California is rich in crack routes. Also, reduce body weight. For this trip, I weighed 88kg (195lb). Hauling was easy, but climbing felt heavy. Surprisingly, I returned home at the same weight, even though legends say one burns 3000–5000 calories daily on a Big wall.
Overall, these changes could speed up the process by 50%.
About the Routine
- Lighten everything possible.
- Get a lighter platform and bag.
- Choose lighter food, but a can of beer is a must.
- Improve rope ascent techniques. There’s room for me for improvement. Techniques vary based on the wall angle. I need to master them all.
- Improve rope management at stations. We were always extra cautious and coiled repeatedly, wasting time and energy.
Big wall climbs are cool. And those for beginners don’t require a high climbing level.
I highly recommend it to everyone.


Comments