Face recognition on 330 million faces at 400 images per second
This article was originally posted at Medium.
This article was originally written in Russian by Alexander Tobol and it was published on March 7, 2018, at habr.com.
In 2018 every student or even every high school kid did a pet project with face recognition. The task becomes much harder if your dataset is not one million people but:
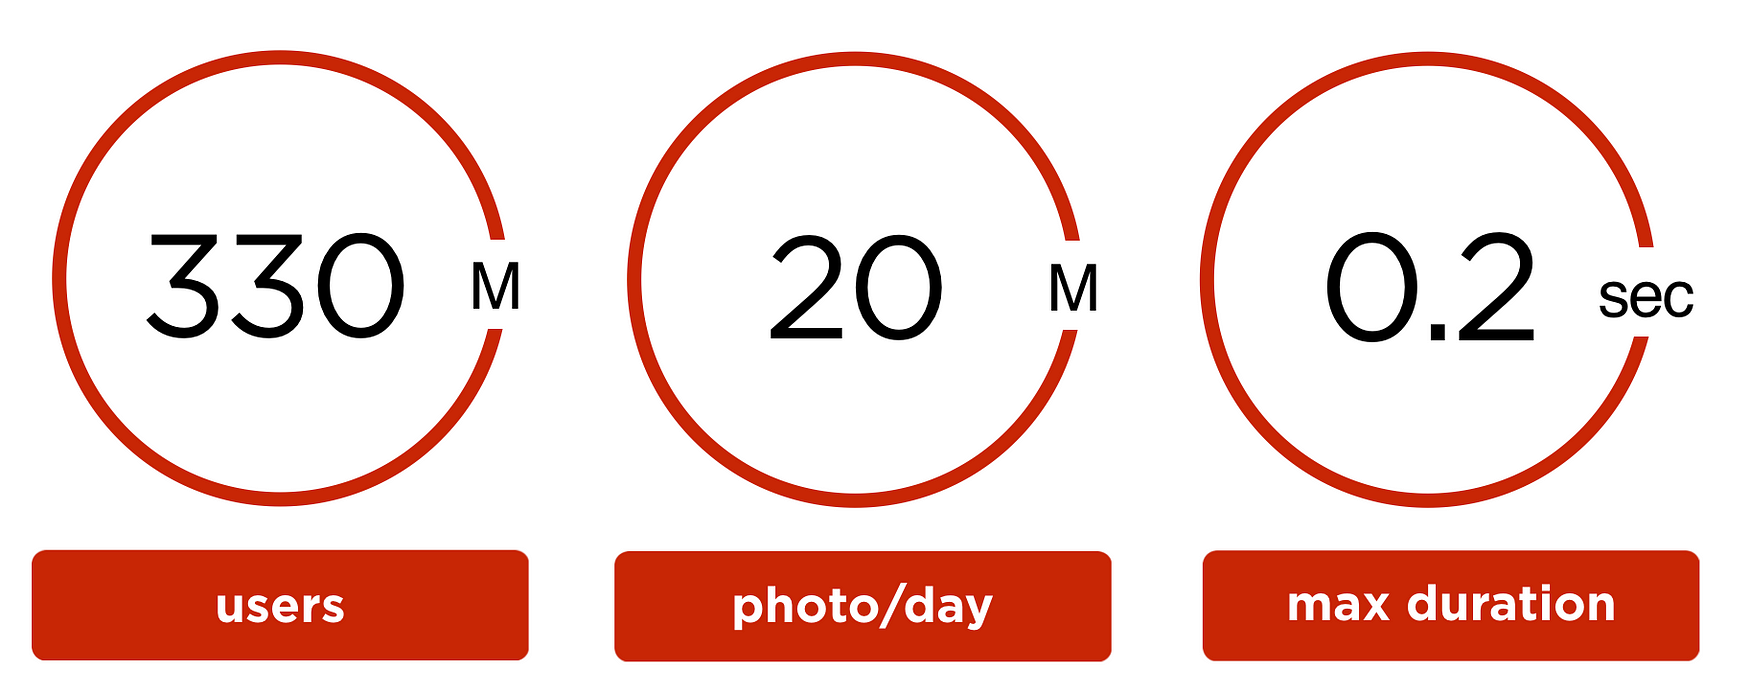
- 330 million of the user accounts
- 20 million photos are uploaded every day
- 0.2 seconds is the maximum time that you can spend per image
- your hardware is limited
In this article, we share our experience with the development and deployment of the face recognition system in the social network OK.Ru.
In this article, we share:
- the math behind the algorithm
- details of the implementation
- results of the deploy
- PR event “StarFace” that we used to promote our solution.
Problem
There are 330 million user accounts at ok.ru. They contain 30 billion images in total.
The users of the ok.ru upload 20 million photos per day. 9 million of these images have at least one face. In total, we have 23 million faces. On average there are 2.5 faces per image.
Users could tag people at the pictures, but they do not do it. Our team decided to build a solution that will automatically tag people in the images.
It is a better user experience if the user will know when someone else uploads images with her.
We want the user to confirm face tags in the same instant as the photo is uploaded. As a result, in the worst-case scenario, the processing should take no more than 200 milliseconds.
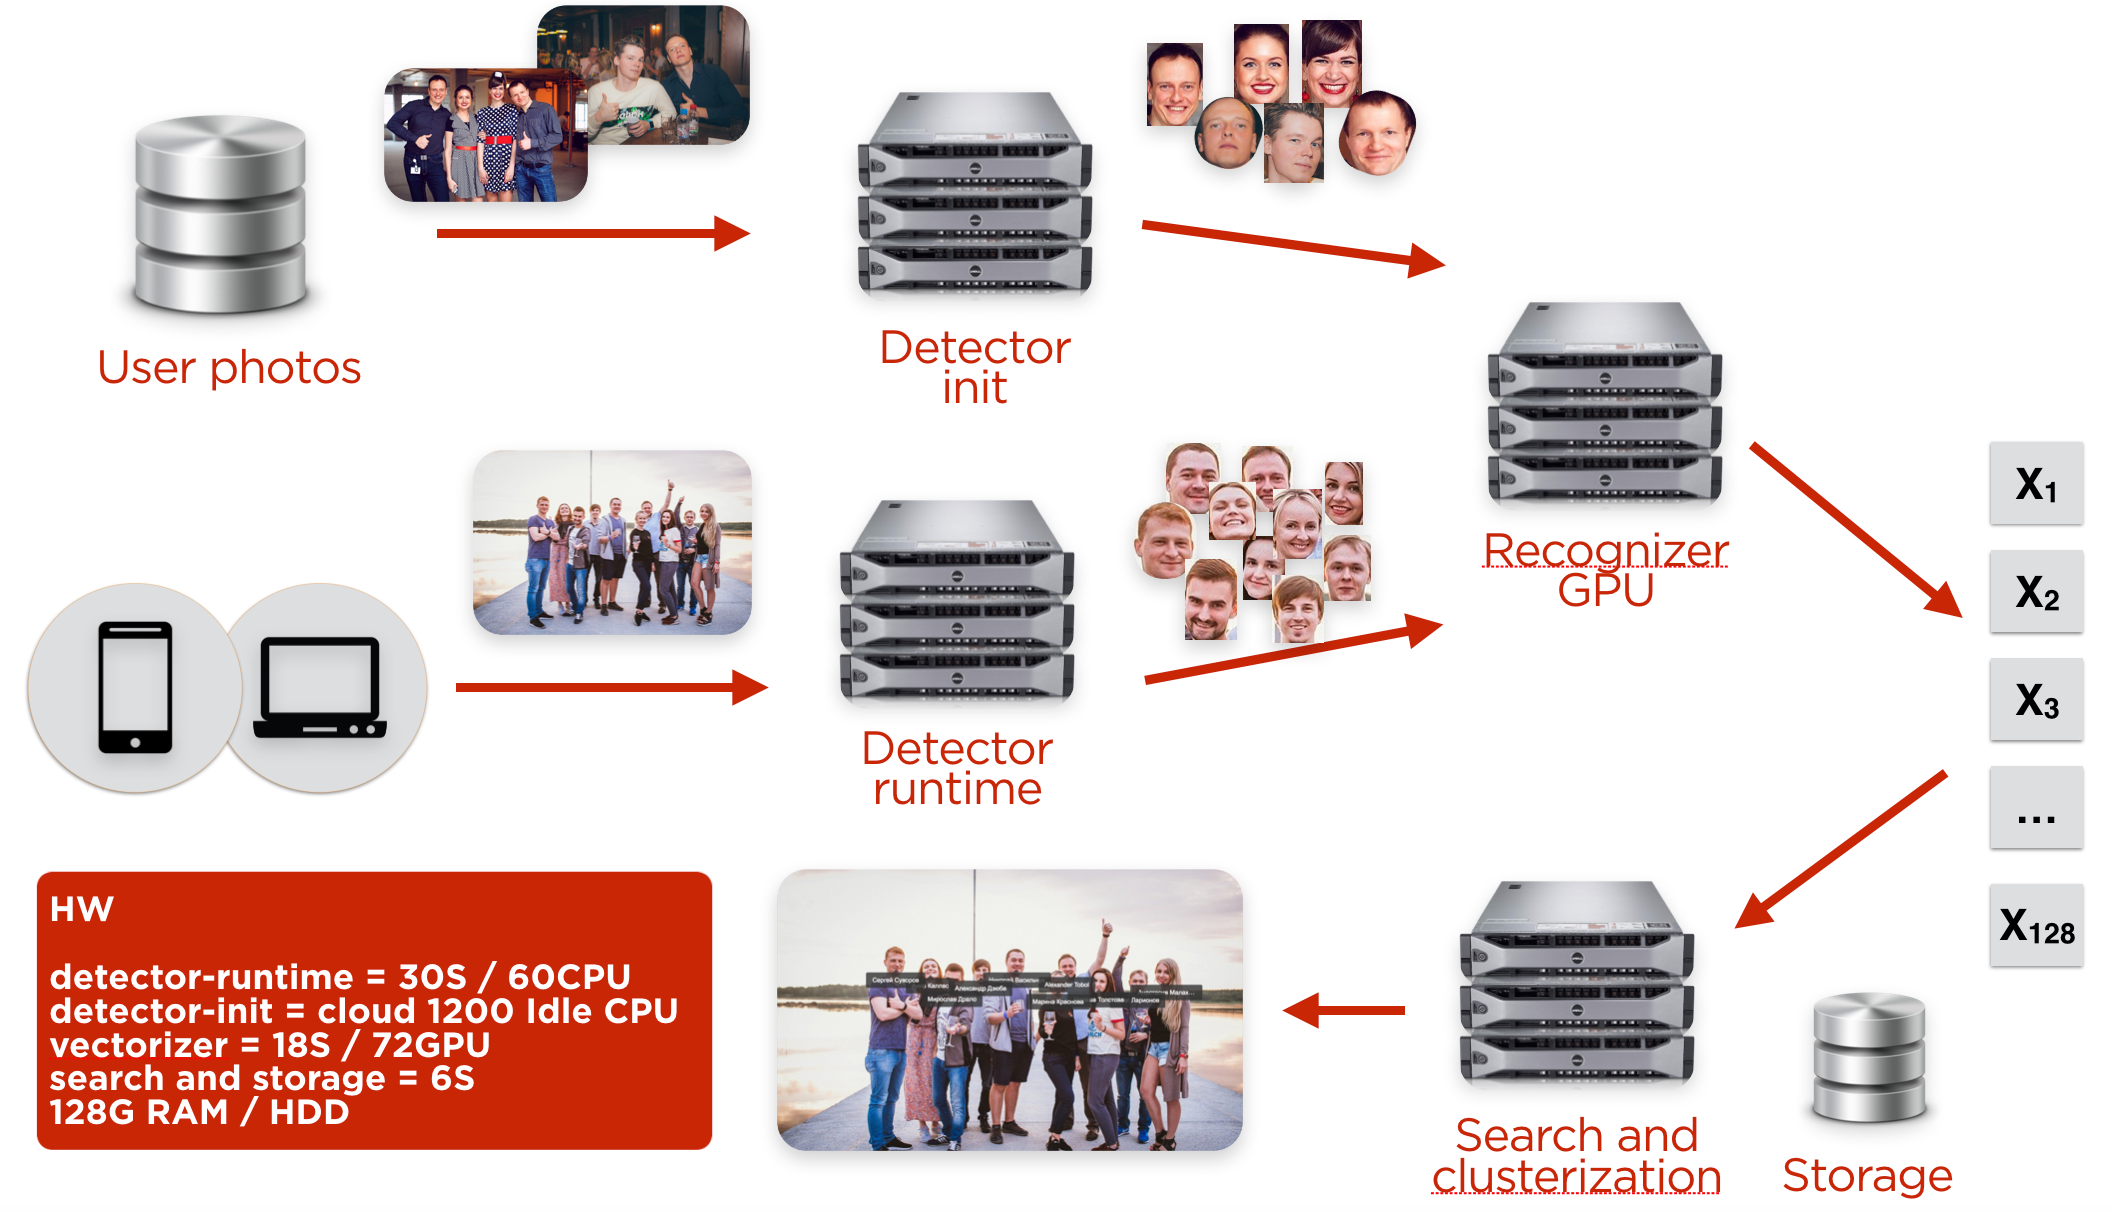
The face recognition pipeline
Face recognition at the image
The user uploads an image from a client: browser, mobile phone with iOS or Android. After this, the image goes through the face detector.

To run automatic face recognition, we need to build a facial profile of every user and fill the database.
The creation of the facial profiles
In general, to build a facial profile, it is enough to have only one picture. The profile picture is not always enough. Users like to put group photos or the photo of the celebrity there.

Hard profile
Let’s consider a user that has the only group pictures. We can deduce the owner of the profile if we know his gender and age and already built friend profiles.

To build the profile we:
Step 1: Use only high-quality pictures.
If the user has a lot of high-quality photos we used the best 100. To estimate the quality of an image we checked
- Did the user tag any of the people?
- Does the photo have meta-information about the type of the camera?
- At some point, the user had this picture as a profile picture.
Step 2: Look for faces at the image.
If there are other people in the image, it is not a big deal.
Step 3: Calculate the embedding vector for every face.
Step 4: Perform the clustering of the embedding vectors.
The goal of the clustering is to figure out which set of the embedding corresponds to the user. There are friends and relatives in the photos. We use DBScan for clustering.
Step 5: Find the “main” cluster
For every cluster we calculated its weight using:
- The size of the cluster.
- Quality of the images forming the cluster.
- If there were face tags on the photos from the cluster.
- Match between age and gender in the user profile and at the images.
- The distance between the centroid of the cluster to the clusters of the friends.
We used linear regression to calculate the coefficients of the parameters.
The correct calculation of age and gender is a separate task that we will cover later.
To call the cluster a “leader,” we need his weight to be larger than the closest cluster’s weight by a margin. We compute this margin on the train set. If we did not find the “leader,” we repeat the procedure but use a broader collection of images. There are users for which we had two clusters. Some families have a joined profile.
Step 6: Calculate the “main” embedding of the user.
The main embedding of the user is the centroid of the leading cluster. There are many ways that could be used to build a centroid. After extensive experimentation, we decided to use the simplest: an average of all embedding in the cluster.
If a user has several clusters, we compute one “main embedding” for each cluster.
We processed 8 billion images during our experiments, worked with 330 user-profiles, and built embedding for 300 million of them. On average, we used 26 pictures per user to create a profile. In general, we could use one image per person. But more images per profile used — the better was our confidence that the profile that we build corresponds to the actual user.
We repeated the process of rebuilding all 300 million profiles a few times. The reason is that the information about friends’ facial profiles improves the quality of the user profile.
Face detector
The first version of the face detector OK launched in 2013. It was the solution based on the third-party provider. The algorithm was similar to the Viola-Jones. In the following years, the solution became outdated — modern approaches based on MTCNN show twice better performance. We decided to follow the trend and use the cascade of the convolutional neural networks (MTCNN).
For the old detector, we used 100 “old” CPU servers. Nearly all modern face detection algorithms use convolutional neural networks (CNN) that perform the best on GPUs. We did not have an option to buy enough GPUs: cryptocurrency miners purchased all that was available.
The comment from the translator: The summer of 2018 was the cryptocurrency boom. GPU prices went up a few times, and even with such high rates, it was hard to buy a GPU.
We decided to run our new detector on the CPUs that we used for the old one.
To detect faces on the images that users upload, we use the cluster of 30 machines. Face detection and the generation of the embedding (iterations on the user accounts) we perform on 1000 virtual machines with the low priority in our cloud.
(The details of our cloud solution are described in the article One-cloud — ОС уровня дата-центра в Одноклассниках by Оleg Anastasiev. The material is in Russian!)
When we analyzed our face detector’s performance, we found the corner case: the first stage of the cascade allows too many candidates to the second stage. The detector started working slower.
For example, at these photos, it was taking up to 1.5 seconds per image.

An example of having a lot of candidates after the first stage of the cascade.
To fix the issue, we used the assumption that typically photo does not have too many people. We modified the pipeline to keep no more than 200 most confident candidates after the first stage. This optimization improved the worst prediction four times. From 1.5 seconds to 350 milliseconds.
There were a few more optimizations. For example, we replaced Non Maximum Suppression (NMS) after the first stage with Blob Detection. The modification decreased the inference time 1.4 times without the loss in quality.
We need to admit that there is a lot of progress in the field, and there are works like FaceBoxes. It can happen that we will update our face detection solution in the future.
Face identification (embedding extraction)
We experimented with the Wide ResNet, Inception-ResNet, Light CNN network architectures. Inception-Resnet was slightly better, and at the moment, it was our choice.
To perform face identification, we need a neural network. One option is to find a pre-trained model on the internet. The other is to train it ourselves.
To train the network you need train and validation datasets. Face identification is a well-studied task. There are datasets: MSCeleb, VGGFace/VGGFace2, MegaFace. The problem is that the generalization ability of the networks trained on them is not good.
Faces at our portal are quite different from faces that exist at the research datasets:
- Different age distribution. We have kids in our images.
- Different ethnical distribution.
- We have pictures of low quality and resolution. We have group photos.
To overcome the third point, we can use image augmentation. Downsample and JpegCompression transforms will do the job.
The comment from the translator: Albumentations library has the number of transforms that can mimic the image’s low quality.
After a few iterations, we converged on the following procedure:
Step 1: Download photos from ~100k open profiles.
We chose the profiles randomly, minimizing the number of friend connections between them. As a result, we assume that each person will appear only in one profile.
Step 2: Build face embeddings.
We use Facenet pre-trained network.
Step 3: Cluster faces for every account.
- We do not know how many people will appear on the images corresponding to one account. As a result, we should not use “number_of_clusters” as an input to our clustering algorithm.
- In the ideal situation, we expect to get very similar embeddings for the user forming a dense sphere. In practice, it is not the case. For example, we can have a clot for a person in glasses and a person without them. As a result, centroid based methods will not work for us. We need to use density-based.
For these two reasons, we used DBScan. We manually choose hyperparameters and performed visual validation, which is pretty standard. For the main hyperparameter “eps,” we introduced a heuristic based on the number of people in the account.
Step 4: Cluster filtering
The primary sources of the noise in the dataset and how we dealt with them:
- Clusters corresponding to different people merge into one cluster. It may happen due to the limitations of the Face-Id network or the density-based nature of the DBScan. The solution: if two or more faces came to the cluster from the same image, we removed this cluster. As a result, people who like selfie collages did not become parts of our dataset. The fix decreased a few times the number of false merges, so it was worth it.
- A few clusters may correspond to the same person. A person in and without glasses. A person using makeup or not. We came up with the following solution: We measure the distance between clusters. If it below a threshold, we merge clusters. If not, we remove one of the clusters.
- A face detector makes a mistake and detects something that is not a face. Luckily, this is easy to fix.
Step 5: Fine-tune the network on the data that we got and go back to step 2.
Repeat 3–4 times till convergence. Gradually the network becomes better. At the last iterations, networks became so good that our heuristics stop adding value.
We decided that more diversity better and extended our newly obtained OKFace dataset (3.7 million faces, 77k people) with something else.
Our experiments showed that the most addition is VGGFace2. It is large and diverse (angles and lightning). As usual, it consists of the celebrity photos found on Google. It has a large amount of noise in labels. Luckily, cleaning it with the network, trained on OKFace, is a relatively straightforward task.
Loss function
What is the best loss function for Embedding learning is an open question. For our work, we choose to use the loss function that is as similar to the use in production as possible.
We use cosine similarity to compare the embedding “x” with the centroids from the candidate embeddings (user and his friends) c1, …, cn. If cos(x, ci) ≥ mp, we claim that it is indeed the user at the photo.
As a result, we want:
- For the “correct” candidate t, cos(x, ct) was larger than margin value mp.
- For others, it should be smaller than mp.
We penalize the deviation from the desired result with the following loss function. This one worked the best in our experiments.

Centroids c1, …, cn are the network’s parameters and are learned during training with the gradient descent.
This loss function has its problems. First, it does not converge well when you train it from scratch. Second, tuning two parameters “mp” and “mn” is cumbersome. Nevertheless, fine-tuning with this loss function allowed us to get better performance than with other functions: Center Loss, Contrastive-Center Loss, A-Softmax (SphereFace), LMCL (CosFace).

Numbers are an average of 10 measurements and standard deviation.
An important metric for us is TP@FP: The percent of people that we identify correctly when the number of false positives is fixed. (0.1% in the table)
With the limit of one mistake per 1000 and without fine-tuning we were able to identify only half of the people correctly.
The minimization of false face detections
Sometimes face detector finds human faces in the places where there are no faces exist. (4% of the detections).
It is undesirable to get such a “noise” to the train set. It is a bad user experience when we ask users “to put the name” on the bouquet of roses or in the middle of the carpet.
The most straightforward fix is to add to the train set for a face detector, a collection of images that do not contain human faces.

We decided to solve the problem differently.
- Collect a few images that do not contain faces from the internet.
- Create random crops, build embeddings, and cluster them. We got 14 clusters.
- If the face’s embedding is close to the centroid of the “nonface” cluster, we conclude that the proposed face s not face.
- Celebrate our method.
The described schema could be implemented as a two-layer network with 14 hidden units on top of the embeddings.
Curiously, the face id network sends all variety of the nonface images only to a few regions of the embedding space.
Everyone lies or how to find the real age and gender of the person in a social network
Pretty often, users do not show their age or write an incorrect number. To deduce the correct value of the user, we use the graph of friends. In general, the age of the user lies in the largest cluster of his friends’ ages. The gender we deduced from the first and last names.
(Vitaly Hudobashov talks about the details in his lecture Как узнать возраст человека в социальной сети. The lecture is in Russian.)
All the internal infrastructure at OK.Ru is in Java. Hence all the components of our pipeline are wrapped in Java. Face detector and Face recognizer perform inference in TensorFlow with Java API. Face Detector works at CPU. It is fast enough and works well on the existing hardware. For the recognizer, we installed 72 GPUs. It is more efficient to run Inception Resnet on GPU rather than CPU.
To store the embedding, we use Cassandra. The total volume of the embeddings for all our users ~300Gb, hence for the fast access, we add cache. We implement the cache as an off-heap.
(The details are described in the article by Andrey Pangin: Использование разделяемой памяти в Java и off-heap кеширование. In Russian)
The pipeline that we built can work with up to 1 billion photos per day for iteration. In parallel, we process images that users upload. ~20 million per day.
Results
We implemented a system that is trained on the real data from the social network. It was trained with limited resources and showed good results.
The quality of the recognition on the dataset built on the real OK.ru data was TP=97.5%, with the FP=0.1%. The average time to process an image is 120 ms, and the 99th percentile is below 200ms. The system is self-improving. More images the use tags, better the face embedding profile of the user.
Now, after the upload, users that we found at the image get a notification. They can confirm the proposed automatic label or can delete it if they do not like the picture.

Automatic recognition twofold increased the number of views in the feed with updates, and the number of clicks increased threefold. The interest of the users’ to the new feature is apparent. We plan to improve it further with a better UI and new applications like Starface.
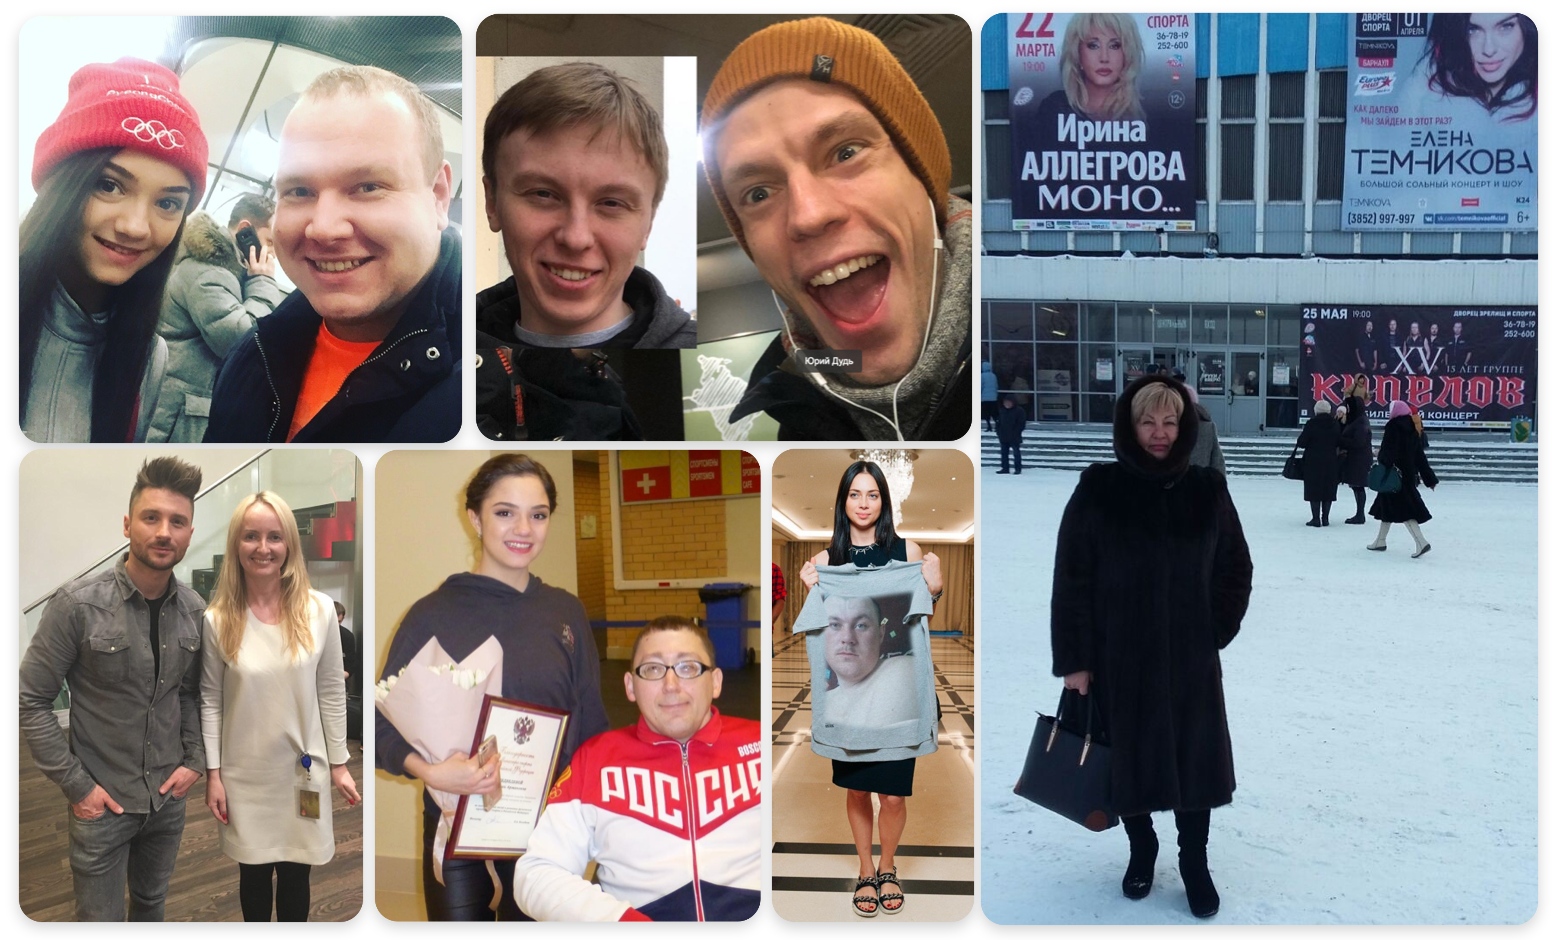
Flashmob StarFace
To introduce the new functionality to users, OK.ru started a challenge. Users upload their images with the stars of Russian sport, business, media, famous bloggers, journalists who have active accounts in OK.ru. Users get a badge to the profile picture or a subscription to the paid-only service. (Details. In Russian.)
Users uploaded more than 10,000 pictures with celebrities in the first days of the flashmob. Users uploaded a selfie with stars, photos near the posters, and photoshopped images.
Plans
The most time-consuming part of the pipeline is the detector. The next step is to replace it or move to the GPU.
We can try to combine different face recognition model. If it boosts the accuracy of the model, it is worth exploring.
The next step from the user perspective would be the recognition of the people in the video. We are also planning to inform users about their “clone profiles.”
Feel free to add ideas for the applications of our face recognition system in the comments at “Щи, или Распознавание 330 млн лиц на скорости 400 фото / сек”.


Comments